ShopDreamUp AI ArtDreamUp
Deviation Actions


![[Tutorial] Hair coloring](https://images-wixmp-ed30a86b8c4ca887773594c2.wixmp.com/f/a49d183b-7ee8-459b-b6dc-0d63dc66c6b0/dcpwk78-4f898383-ce18-44a4-aadc-42c1079cc710.png/v1/crop/w_184,h_184,x_0,y_0,scl_0.12266666666667,q_70,strp/_tutorial__hair_coloring_by_aliam_vitam_dcpwk78-92s-2x.jpg?token=eyJ0eXAiOiJKV1QiLCJhbGciOiJIUzI1NiJ9.eyJzdWIiOiJ1cm46YXBwOjdlMGQxODg5ODIyNjQzNzNhNWYwZDQxNWVhMGQyNmUwIiwiaXNzIjoidXJuOmFwcDo3ZTBkMTg4OTgyMjY0MzczYTVmMGQ0MTVlYTBkMjZlMCIsIm9iaiI6W1t7ImhlaWdodCI6Ijw9MTAyNCIsInBhdGgiOiJcL2ZcL2E0OWQxODNiLTdlZTgtNDU5Yi1iNmRjLTBkNjNkYzY2YzZiMFwvZGNwd2s3OC00Zjg5ODM4My1jZTE4LTQ0YTQtYWFkYy00MmMxMDc5Y2M3MTAucG5nIiwid2lkdGgiOiI8PTEwMjQifV1dLCJhdWQiOlsidXJuOnNlcnZpY2U6aW1hZ2Uub3BlcmF0aW9ucyJdfQ.n0fYYaExXtl9LRrU7_wuZ4eqTKmS7y0k1kOg0DgLEL8)
![[Tutorial] Hair coloring](https://images-wixmp-ed30a86b8c4ca887773594c2.wixmp.com/f/a49d183b-7ee8-459b-b6dc-0d63dc66c6b0/dcpwk78-4f898383-ce18-44a4-aadc-42c1079cc710.png/v1/crop/w_92,h_92,x_0,y_0,scl_0.061333333333333,q_70,strp/_tutorial__hair_coloring_by_aliam_vitam_dcpwk78-92s.jpg?token=eyJ0eXAiOiJKV1QiLCJhbGciOiJIUzI1NiJ9.eyJzdWIiOiJ1cm46YXBwOjdlMGQxODg5ODIyNjQzNzNhNWYwZDQxNWVhMGQyNmUwIiwiaXNzIjoidXJuOmFwcDo3ZTBkMTg4OTgyMjY0MzczYTVmMGQ0MTVlYTBkMjZlMCIsIm9iaiI6W1t7ImhlaWdodCI6Ijw9MTAyNCIsInBhdGgiOiJcL2ZcL2E0OWQxODNiLTdlZTgtNDU5Yi1iNmRjLTBkNjNkYzY2YzZiMFwvZGNwd2s3OC00Zjg5ODM4My1jZTE4LTQ0YTQtYWFkYy00MmMxMDc5Y2M3MTAucG5nIiwid2lkdGgiOiI8PTEwMjQifV1dLCJhdWQiOlsidXJuOnNlcnZpY2U6aW1hZ2Uub3BlcmF0aW9ucyJdfQ.n0fYYaExXtl9LRrU7_wuZ4eqTKmS7y0k1kOg0DgLEL8)


Description
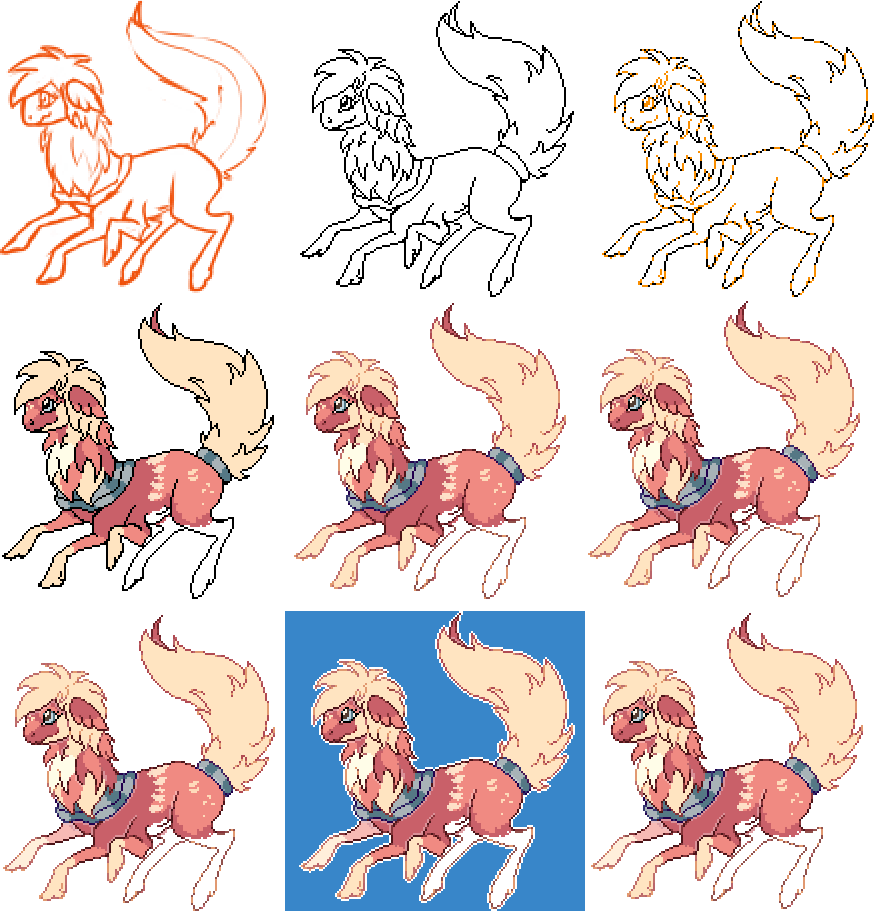
As mentioned before, I said I would do a tutorial for how I do pixel dolls so here goes!
NOTE: The above is an enlarged version of the finished pixel doll, so it's easier to see the steps! Here's the original size if you're interested: sta.sh/02cg10wmd1h9
This is a tutorial for how *I* draw pixel dolls. It is not the way everyone does it, it's just the way I do it!
Tools used: Sai, tablet
Time: a few hours
Character belongs to Th3Frgt10Warrior
STEP 1) Sketch your character! I use Sai for pixelling so my tutorial will be pretty Sai orientated but you can follow this on any program that has layers! So I sketch on a 700x700 canvas (i know, i sketch big lmao) and then resize down to 150x150 (as that was the pixel doll size requested). You can sketch directly onyl 150x150 if you want to! I just find it easier drawing big and scaling it down.
STEP 2) Low the opacity of your sketch and create a new layer. DEFINITELY CREATE A NEW LAYER") I've screwed up a lot and done the lineart on the sketch layer before haha it's incredibly annoying ;; Just use a 1px pencil and go over your sketch! It doesn't have to be clean here, you'll tidy it up in the next step! Don't be afraid to change your lineart from the sketch, nothing is ever set in stone with art
I've screwed up a lot and done the lineart on the sketch layer before haha it's incredibly annoying ;; Just use a 1px pencil and go over your sketch! It doesn't have to be clean here, you'll tidy it up in the next step! Don't be afraid to change your lineart from the sketch, nothing is ever set in stone with art ") One thing I can say is never listen to those tutorials that tell you to not have several pixels touching each other ie so you have a "corner" if you get me. I think that with lineart, there really isn't any rules you need. Sometimes it's necessary to add these "corners"/joining pixels because it adds some depth to your work instead of only using 1px lines. Just get a feel of what you're drawing, zoom out periodically and take a look at how it's looking overall. When you're done, hide your sketch layer. (you can even delete it if you want to!)
One thing I can say is never listen to those tutorials that tell you to not have several pixels touching each other ie so you have a "corner" if you get me. I think that with lineart, there really isn't any rules you need. Sometimes it's necessary to add these "corners"/joining pixels because it adds some depth to your work instead of only using 1px lines. Just get a feel of what you're drawing, zoom out periodically and take a look at how it's looking overall. When you're done, hide your sketch layer. (you can even delete it if you want to!)
STEP 3) Now tidy up your lineart a little bit! I've made the feet and tail have a bit thinner lineart and played around with the mouth a little. After that, tick the "preserve opacity" box for the layer (ie LOCK the layer). Now I think this is the step that really changes things! What you want to do, is create a new layer and group it to your locked lineart layer (in Sai, tick the "Clipping Group" box under "preserve opacity", in Photoshop, I think it's Crtl + G, but i'm not too sure!). Using a different colour, highlight any parts of the lineart that you feel should be lighter (e.g. the tops of fur, strands of hair) and then go a little crazy and put lighter parts in a few almost "random" places haha! I tend to use a light grey colour for this temporarily but used orange here because it shows up brighter in the tutorial! it doesn't really matter though, you'll be changing the colour later. One tip I can say is that eyes typically look better in black, so I would tend to leave the majority of the eye lines in solid black. That's just personal preference for me though (Smile)")
STEP 4) Okay, so when you're done with that, hide the layer so that you're just working with your solid black lineart showing. Create a new layer underneath your lineart layer and block in one colour for everything you're going to colour. Then lock the layer, and create a new layer above it. Group it to the solid colour layer (Clipping mask) and start to add your base colours in. I use a new layer for each colour since I sometimes want to edit the colours slightly at the end and it's easier to do when the whole colour is on one layer Make sure to lock the layers when you're done if you intend to change colours later!
STEP 5) Colour your lineart! Experiment, try using colours you wouldn't ever have thought to use! Here, I coloured the black lineart a darker red/brown colour, with the blue clothing to have darker blue lines, and the tail etc to have orange/brown lines. Don't just take the base colour and drag the hew down so it's darker, try things like, if you've got a light blue base, try lines in purple, or if you've got yellow lines, a strawberry-orange sort of colour. Go a little crazy Then do the same with the layer of lighter lineart
 ")
STEP 6) Okay, so these next steps are more just what I do and what I prefer to do for pixels! In this one, I created a new layer above everything and went over some details in white. Note the face, under the scarf and the legs. I think it accents the limbs etc a little bit more but sometimes it's really not necessary (it probably wasn't really necessary here lmao) Lower the opacity to whatever you feel looks good (I think it's about 30% here)
STEP 7) A new layer, on top of everything, colour the limbs that are further away in white. Again, just a preference, it's just what I tend to do Was probably unnecessary here as well haha! Lower opacity to what looks best. This is about 40% i think!
STEP 8) New layer, on the bottom, colour it any colour you want to, as long as it's not too light. Preference again, I outline my pixels in white Pretty self explanatory! Just make sure you CREATE A NEW LAYER ABOVE THE COLOURED ONE. You don't want to be outlining in white on the coloured layer!
STEP 9) Delete the coloured layer and merge all the visible layers! (Layer > Merge Visible Layers) Aaand you're done!
I hope this has been somewhat useful! If you do end up using this tutorial, please show me what you pixelled with it! I'd love to see
Any questions, just let me know! Thanks!
The final:
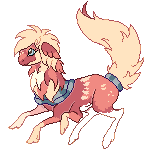
NOTE: The above is an enlarged version of the finished pixel doll, so it's easier to see the steps! Here's the original size if you're interested: sta.sh/02cg10wmd1h9
This is a tutorial for how *I* draw pixel dolls. It is not the way everyone does it, it's just the way I do it!
Tools used: Sai, tablet
Time: a few hours
Character belongs to Th3Frgt10Warrior
STEP 1) Sketch your character! I use Sai for pixelling so my tutorial will be pretty Sai orientated but you can follow this on any program that has layers! So I sketch on a 700x700 canvas (i know, i sketch big lmao) and then resize down to 150x150 (as that was the pixel doll size requested). You can sketch directly onyl 150x150 if you want to! I just find it easier drawing big and scaling it down.
STEP 2) Low the opacity of your sketch and create a new layer. DEFINITELY CREATE A NEW LAYER
STEP 3) Now tidy up your lineart a little bit! I've made the feet and tail have a bit thinner lineart and played around with the mouth a little. After that, tick the "preserve opacity" box for the layer (ie LOCK the layer). Now I think this is the step that really changes things! What you want to do, is create a new layer and group it to your locked lineart layer (in Sai, tick the "Clipping Group" box under "preserve opacity", in Photoshop, I think it's Crtl + G, but i'm not too sure!). Using a different colour, highlight any parts of the lineart that you feel should be lighter (e.g. the tops of fur, strands of hair) and then go a little crazy and put lighter parts in a few almost "random" places haha! I tend to use a light grey colour for this temporarily but used orange here because it shows up brighter in the tutorial! it doesn't really matter though, you'll be changing the colour later. One tip I can say is that eyes typically look better in black, so I would tend to leave the majority of the eye lines in solid black. That's just personal preference for me though
STEP 4) Okay, so when you're done with that, hide the layer so that you're just working with your solid black lineart showing. Create a new layer underneath your lineart layer and block in one colour for everything you're going to colour. Then lock the layer, and create a new layer above it. Group it to the solid colour layer (Clipping mask) and start to add your base colours in. I use a new layer for each colour since I sometimes want to edit the colours slightly at the end and it's easier to do when the whole colour is on one layer
STEP 5) Colour your lineart! Experiment, try using colours you wouldn't ever have thought to use! Here, I coloured the black lineart a darker red/brown colour, with the blue clothing to have darker blue lines, and the tail etc to have orange/brown lines. Don't just take the base colour and drag the hew down so it's darker, try things like, if you've got a light blue base, try lines in purple, or if you've got yellow lines, a strawberry-orange sort of colour. Go a little crazy
STEP 6) Okay, so these next steps are more just what I do and what I prefer to do for pixels! In this one, I created a new layer above everything and went over some details in white. Note the face, under the scarf and the legs. I think it accents the limbs etc a little bit more but sometimes it's really not necessary (it probably wasn't really necessary here lmao) Lower the opacity to whatever you feel looks good (I think it's about 30% here)
STEP 7) A new layer, on top of everything, colour the limbs that are further away in white. Again, just a preference, it's just what I tend to do
STEP 8) New layer, on the bottom, colour it any colour you want to, as long as it's not too light. Preference again, I outline my pixels in white
STEP 9) Delete the coloured layer and merge all the visible layers! (Layer > Merge Visible Layers) Aaand you're done!
I hope this has been somewhat useful! If you do end up using this tutorial, please show me what you pixelled with it! I'd love to see
Any questions, just let me know! Thanks!
The final:
Image size
887x918px 75.22 KB
© 2014 - 2024 RubyPetal
Comments22
Join the community to add your comment. Already a deviant? Log In
What do you use to draw pixel art?